
Testing Vite React JS 18 app using Vitest and Testing Library
Here in the blog you will learn how to work with Vitest.
Before starting, you should know that there are many Vitest example in this link for different libraries.
First, initialize a fresh Vite project using this guide Vite js. Vite is a build tool designed to greatly enhance the frontend development experience.
Vite incorporates a native unit testing framework (Vitest) which is built on top of it, boasts a range of rich and modern features. Vitest is a kind of test runner which finds the test and run them.
What you only need after that is to install the Vitest as a dev dependency.
npm install -D vitest
Later in this article you will find we will install more dependencies, and testing library to test specifically React and React components. Right now, the Vitest as the unit testing framework is enough for having a quick progress. But don't forget that we need a testing library as well.
To organize your project and make the concerns separated,
you should make a __test__ directory for putting your test files there.
I recommend using underscore _ in the directory name
to not have a conflict with the other directory name in the future.
In the src directory of Vite js project you can write your first test file like sum.js.
Then in the __test__ directory write your first test file like sample.test.js
import { expect, test, it } from 'vitest'
import { sum } from '../sum'
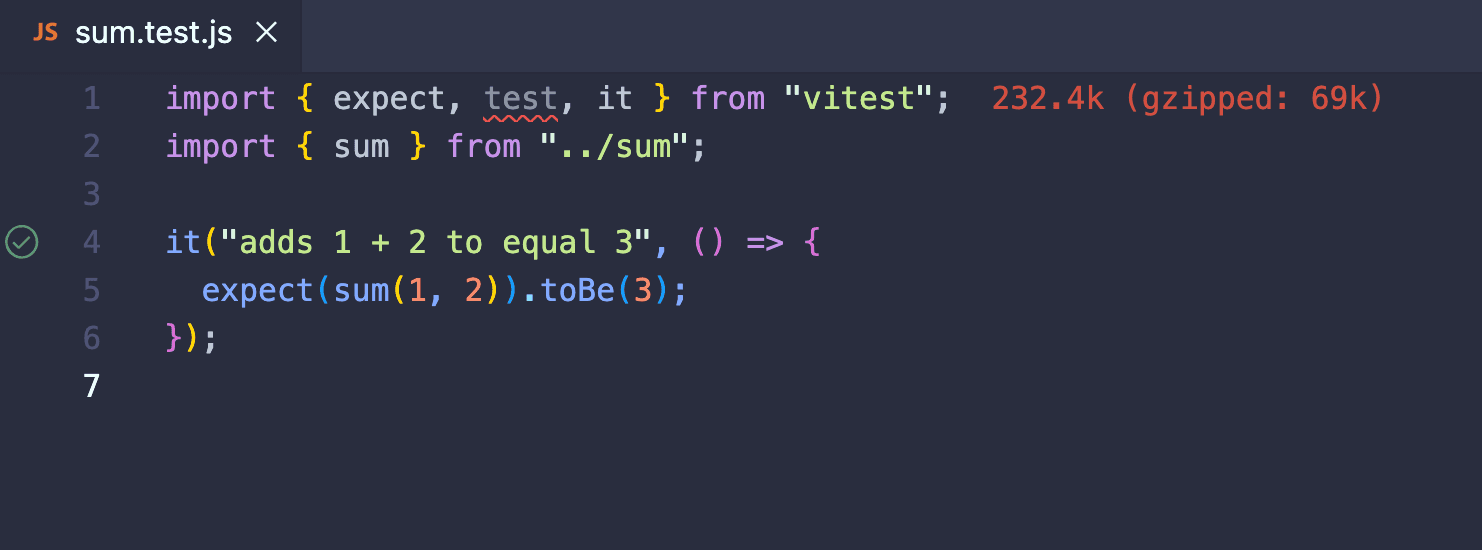
it('adds 1 + 2 to equal 3', () => {
expect(sum(1, 2)).toBe(3)
})
The syntaxes are the same as the syntax of Jest library Jest document.. And Vitest has the very similar API, look at the doc Vitest.
As you notices I have imported both test and it from vitest.
and I can use them interchangeably.
like
it('adds 1 + 2 to equal 3', () => {
  expect(sum(1, 2)).toBe(3)
})
or
test('adds 1 + 2 to equal 3', () => {
  expect(sum(1, 2)).toBe(3)
})
Now is the time to run your test. To run this you have two options.
You can use the vitest binary in your npm scripts, or run it directly with npx vitest.
If you want to use the vitest binary in your npm scripts, what you should do is adding this to package.json file:
{
  "scripts": {
    ...
    "test": "vitest"
  }
}
and then run npm run test, yarn test, or pnpm test, depending on your package manager.
The second option is to run directly npx vitest.
In order to integrate VScode with Vitest check this page Official VScode Vitest extension
This is the link to the screenshots of the extension visit Vites extension repo
Debug
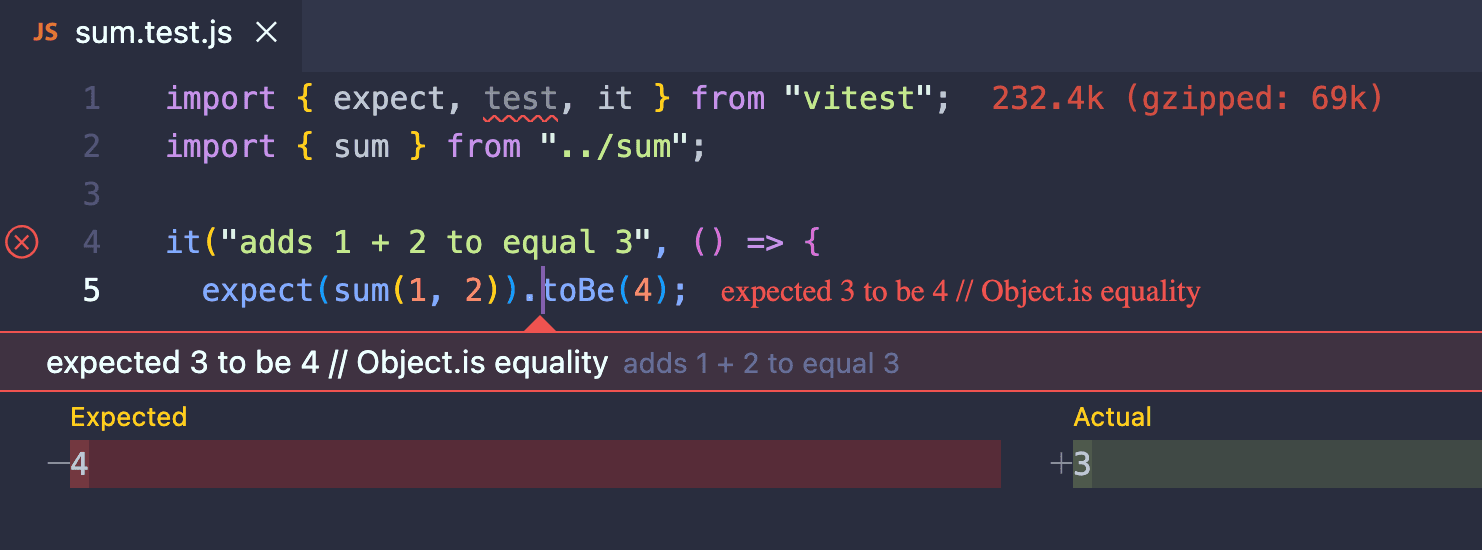
Look at the "tick" on the left-side column.
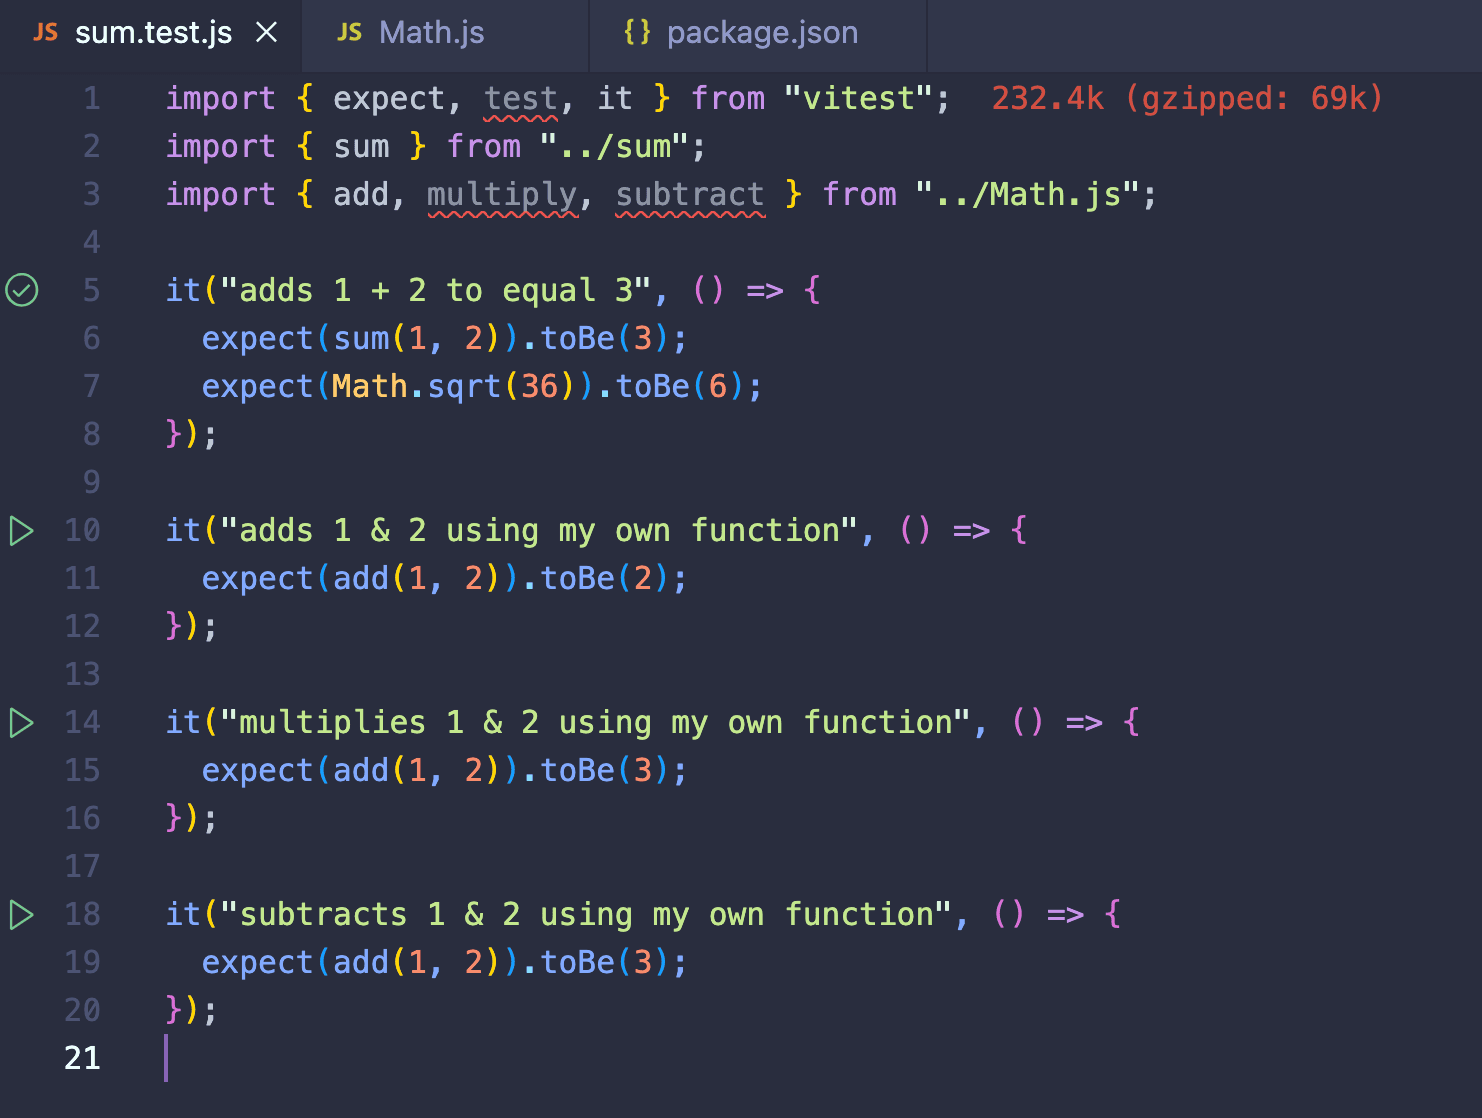
Also look at the triangle on the left-side column which you can run your test just by a click on.
describe
We can group some tests together (using describe() method)
when they are can be described by one statement or explanation.
Suppose the Math.js is:
export const add = (a, b) => {
  return a + b
}

export const multiply = (a, b) => {
  return a * b
}

export const subtract = (a, b) => {
  return a - b
}
Then our test could be:
import { expect, test, it, describe } from 'vitest'
import { sum } from '../sum'
import { add, multiply, subtract } from '../Math.js'

it('adds 1 + 2 to equal 3', () => {
  expect(sum(1, 2)).toBe(3)
  expect(Math.sqrt(36)).toBe(6)
})

describe('apply our custom functions in Match.js', () => {
  it('sums 1 & 2 using my own function', () => {
    expect(add(1, 2)).toBe(3)
  })

  it('multiplies 1 & 2 using my own function', () => {
    expect(multiply(1, 2)).toBe(2)
  })

  it('subtracts 1 & 2 using my own function', () => {
    expect(subtract(1, 2)).toBe(-1)
  })
})
Till now we have just used the toBe() as a matcher on expect() method.
As there are some APIs in the Jest library jest,
you can find the similar APIs and matchers on expect() method,
in the document of Vitest.
Let's apply toContain() matcher as follow and run it.
describe('Strings tests', () => {
  it('contains a string', () => {
    expect('This is a string').toContain('is a string')
  })
})
Features
By having a look at this page in the Vitest document,
you will see that it supports, jsdom, jest-compatible Snapshot and some other important libraries.
Vitest UI
Now is the time to see what is Vitest UI. Vitest also has a dev server under the hood when running the tests. This allows Vitest to provide a beautiful UI to view and interact with your tests.
You'll need to install it with:
npm i -D @vitest/ui
and run it like:
npx vitest --ui
or modify the package.json like:
  "scripts": {
    "dev": "vite",
    "build": "vite build",
    "lint": "eslint . --ext js,jsx --report-unused-disable-directives --max-warnings 0",
    "preview": "vite preview",
    "test": "vitest",
    "test:ui": "vitest --ui"
  },
and then run:
npm run test:ui
a new tab of browser will be available you can visit the Vitest UI at http://localhost:51204/**vitest**/
Then you can visit the Vitest UI at http://localhost:51204/**vitest**/
Testing a react component
Step 1:
First we need to install a library as the React testing utilities Testing Library.
You need to run this:
npm install -D @testing-library/react
Step 2:
Then we need a Dom environment for running our tests. JSDOM is for this purpose.
and run the following command to install jsdom:
npm install -D jsdom
Step 3:
Then run this:
npm install -D @testing-library/jest-dom
It is required later to extend the expect() method
from Vitest to include the assertion methods in matchers from this package. See Step 4.
In the future, for configuring test in a Vite project, you may want to install all the dependencies together once, in one command like:
npm install -D vitest jsdom @testing-library/react @testing-library/jest-dom @testing-library/user-event
Step 4:
Since we are in a Vite project,
we need to instruct the Vite configuration to sync with Vitest.
This can be possible by just editing the vite.config.js,
otherwise we need to make a vitest.config.ts and write some configuration there.
Before:
import { defineConfig } from 'vite'
import react from '@vitejs/plugin-react'

// https://vitejs.dev/config/
export default defineConfig({
  plugins: [react()],
})
After:
/// <reference types="vitest" />
import { defineConfig } from 'vite'
import react from '@vitejs/plugin-react'

// https://vitejs.dev/config/
export default defineConfig({
  plugins: [react()],
  test: {
    globals: true,
    environment: 'jsdom',
    setupFiles: './setupTest.js',
  },
})
To know why we use triple slash /// directive, have
a look at the Vitest document.
Make a setupTest.js file and put this code there.
import { expect } from 'vitest'
import matchers from '@testing-library/jest-dom/matchers'

expect.extend(matchers)
chrome extension:
Next you need to install this chrome extension, Testing Playground
Migrating from Jest to Vitest
Given Jest's massive adoption, Vitest provides a compatible API that allows you to use it as a drop-in replacement in most projects, read more here.
Migrating your application's tests from Jest to Vitest is a seamless process. The two testing frameworks share similar APIs, which means significant alterations to your existing code are generally unnecessary when transitioning to Vitest.
First, we need to uninstall Jest from our project and then install Vitest, accompanied by all required dependencies, by executing the following commands:
npm uninstall jest --save-dev
npm install vitest --save-dev
and add Vitest to the package.json:
"scripts": {
  "test": "vitest",
}
Testing Library
As you learn above for testing React components we need the Testing Library.
You need to learn about different concepts. Query and Role are the important ones. Let's first see what is Query.
Testing Library methods are called Queries which gives the ability to find elements on the page. There are several types of queries under these three main categories:
getfindquery
It is highly recommended to read the Testing Library official document to know how they works.
Queries introduction:
get is a query method to find element and will return the matching node for the query.
find it returns a promise and resolves when an element is for the given query.
query if no elements match for the query
then it returns null which is a handy tools to assert an element is not present in the DOM.
Type of query
Depending on what we are looking for, single or multiple Elements we have two different types.
getBy... or getAllBy...,
for more information have a look at the query types.
Role
There different kinds of queries but there some that reflect the experience of visual/mouse users as well as those that use assistive technologies.
One of these kind of queries is getByRole. Read about Role here.
Most of the time, it will be used with the name option like so:
getByRole('button', {name: /submit/i}).
This can query every element that is exposed in the accessibility tree.
You can learn the list of roles here:
Role in summary:
let's see an example:
const element = screen.getByRole('banner')
The getByRole query in JavaScript testing,
particularly when using libraries like React Testing Library,
is a function that allows you to select elements based on their ARIA roles.
ARIA (Accessible Rich Internet Applications) roles provide a way to indicate
what the purpose of an element is (like a button, link, dialog, etc.)
to assistive technologies like screen readers.
getByRole is looking for an element that has an ARIA role of banner.
The banner role typically represents a section of a page that contains
site-oriented content, like a logo or a site identifier.
This is a part of making web content more accessible to users
with disabilities.
The getByRole query is part of a family of queries provided by
testing libraries like React Testing Library that
encourage good accessibility practices.
By selecting elements based on their role,
rather than test-specific attributes or CSS selectors,
you ensure that your tests also validate the accessibility aspects
of your components.
If there's no element with the specified role,
getByRole will throw an error, which makes it useful for
asserting that an element is present in the document.
This is different from queryByRole, which returns null instead of
throwing an error when no elements are found,
and findByRole, which returns a promise and is useful
for asynchronous operations.
testing react hook
https://github.com/testing-library/react-hooks-testing-library
https://react-hooks-testing-library.com/
Note:
the test file name in a typescript project should be: name.test.ts
the chrome extension
The extension you already installed above is very useful to see what should you write in your test specifically when you are not sure about the Role of the html tag.
Be careful userEvent.click() is a promise function
Also In setuping test, it seems there is no need to this extension. in the new versions. to access all the api in this list: https://github.com/testing-library/jest-dom
import { expect } from 'vitest'
import matchers from '@testing-library/jest-dom/matchers'

// expect.extend(matchers);
Also look at this: which is referenced in inspire of jest-dom github link above